Imagine the satisfaction of preparing a perfectly assembled hookah, taking a deep puff, and being greeted with smooth, flavorful smoke. Setting up a hookah might seem daunting, but with the right knowledge and guidance, anyone can become a master. We will walk you through setting up a hookah, from understanding its components to making final adjustments for an optimal smoking experience.
Key Takeaways
Achieving the ideal hookah setup is crucial for an exceptional smoking experience. One can savor smoking with a meticulously prepared hookah through practice and attention to detail. Here’s a brief preview of what we’ll delve into:
- Understanding what a hookah setup is.
- Getting to know the components of hookahs.
- Preparation of the hookah base.
- Assembly of stem and bowl.
- Loading the shisha.
- Adding foil or heat management device.
- Selection and lighting of the hookah coals.
- Assembling the hose and mouthpiece
- Final checks and adjustments.
You will learn the ins and outs of hookah assembly and discover the importance of each component and how they work together to create that perfect smoking experience. So sit back, relax, and dive into the fascinating world of setting up a hookah!
Introduction – Brief Explanation of Proper Hookah Setup
A truly satisfying smoking experience depends on a well-executed hookah setup. Understanding the functions of its components and the correct assembly techniques can significantly enhance your enjoyment.
When a hookah is correctly assembled, it yields smooth, flavorful smoke, creating a delightful experience. Conversely, improper hookah can lead to harsh, short-lived smoke, which can be frustrating and disappointing.
Thus, whether you’re an experienced hookah enthusiast or a beginner, mastering the art of hookah assembly will elevate your smoking experience to new heights, ensuring every session is pleasurable.
Understanding the Components
Before proceeding with the assembly process, familiarizing yourself with the main components of a hookah and its functions is critical. Each part is vital in creating a smooth, enjoyable smoking experience.
Explanation of Each Component
The glass base, or hookah vase, is the lowermost portion of the hookah, which serves to contain the water and provide stability. At the core of the setup is the stem, which is the primary structure, connecting the base to the bowl. It also houses the hose ports where the hoses connect for drawing smoke.
The hookah bowl is where the shisha tobacco, also known as hookah tobacco, is placed, and it sits atop the hookah stem, secured by a bowl grommet. In addition, the metal tray captures any excess tobacco and hot embers that may fall, thus preventing any damage or fire hazard. Moreover, it helps maintain the cleanliness of the smoking area around the hookah pipe.
Finally, the hose is a flexible tube that connects the stem to the mouthpiece, serving as the conduit through which the hookah smoker inhales the flavorful smoke.
Importance of Understanding the Purpose of Each Part
Understanding each component’s purpose is vital for an effective hookah setup. Each part plays a distinct role in creating a seamless and pleasurable smoking experience.
By understanding how these components function together, you will be better equipped to assemble and utilize your hookah effectively.
Steps to Set up a Hookah
Here are the steps:
1. Preparing the Hookah Base
With a clear grasp of the components and their functions, let’s prepare the hookah base.
This involves adding water to the hookah vase and ensuring the correct water level for optimal filtration and smooth airflow.
Adding Water
Fill the base of your hookah with cold water or room temperature water. The water filters and cools the smoke as it passes through the base, providing a smoother and more enjoyable smoking experience. However, it’s crucial to use clean water to prevent any impurities from affecting the flavor or quality of the smoke.
Note that water should fill the base until the stem’s lower part is submerged by roughly 1-1.5 inches.
Understanding Water Level
The proper water level is essential for smooth airflow and better flavor. If the water level is too low, the filtration will greatly reduce, resulting in hot and harsh smoke. On the other hand, if it’s too high, it can restrict airflow and make it challenging to draw smoke.
Remember, experimenting with different water levels can help you find the perfect balance for your preferences.
2. Assembling the Hookah Stem
With the base ready, let’s assemble the hookah stem. This involves securing the stem to the base and checking for potential air leaks affecting the smoking experience.
Securing the Stem
To attach the stem to the base, place a silicone or rubber grommet around the top of the base opening to create an airtight seal. Insert the stem into the base, ensuring that the lower portion is submerged in the water as previously determined.
Gently rotate the stem clockwise to firmly attach it to the base, and give it a slight tug to ensure it’s securely fastened.
Checking for Leaks
Ensuring there are no air leaks is crucial for a smooth smoking experience. To check for leaks, assemble the hookah without water or a bowl and connect the hose to the stem.
Place your finger over the spire (where the bowl sits) and try to draw air through the hose. If you feel suction on your finger, your hookah is airtight, and you’re ready to move on to the next step.
3. Preparing the Bowl
With the base and stem assembled, let’s get the bowl ready. Choosing the right bowl and loading the shisha properly will optimize your smoking experience, ensuring excellent flavor and even heat distribution.
Choosing the Right Bowl
Select a bowl that suits your smoking preferences. Various options are available – traditional bowls are typically constructed from clay, while modern bowls can be made from metal, glass, or silicone.
The size and shape of the bowl will depend on the type of shisha and the quantity you intend to smoke. Therefore, consider factors such as heat absorption, heat retention, and material when selecting your bowl.
Loading the Shisha
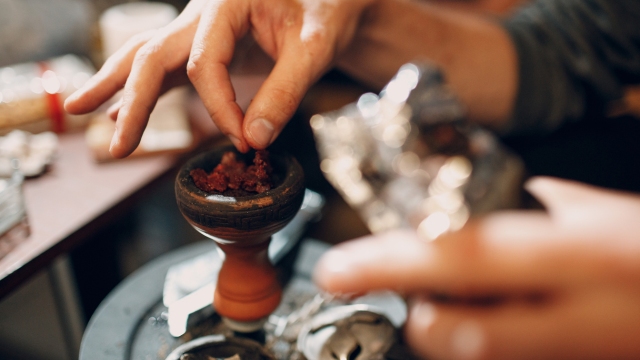
It’s time to load the shisha tobacco with the appropriate bowl selected. First, using a fork, break up the hookah tobacco. Then, evenly distribute the pieces in the bowl.
However, be sure not to overpack or compress the shisha too tightly, as adequate airflow is necessary for efficient combustion. It should be packed just below the bowl’s rim, leaving a small space between the foil and the shisha to prevent burning.
4. Adding Foil or Heat Management Device
With your hookah tobacco loaded into the bowl, you need to decide whether to use foil or a heat management device for heat control. The foil method is traditional, while heat management devices offer a modern alternative for more precise control.
Foil Method
Tear a piece of heavy-duty aluminum foil to utilize the foil method and fold it twice. Wrap the foil around the top of the bowl, creating a tight and even cover.
Using a poker or toothpick, poke small holes in a cylindrical fashion on the foil. This will ensure proper airflow and heat distribution during the smoking session.
Heat Management Device
A heat management device, such as the Kaloud Lotus, is an alternative to aluminum foil, allowing for more precise regulation of hookah’s heat. These devices act as a holder for the charcoal and facilitate heat control, enabling you to enjoy your smoke without worrying about hot embers.
5. Igniting the Coals
With your hookah and bowl ready, let’s ignite the coals. The type of coals you choose and the lighting process will affect the quality of your smoking experience, so it’s essential to select quality hookah coals and light them correctly.
Choosing Quality Coals
Opt for natural coconut-shell charcoal for the best results. This type of coal is renowned for its clean combustion, extended heat duration, and minimal ash production, making it an ideal choice for hookah smoking.
Furthermore, avoid quick-light coals, as they contain chemical accelerants that can impart an undesirable flavor to your shisha.
Lighting Process
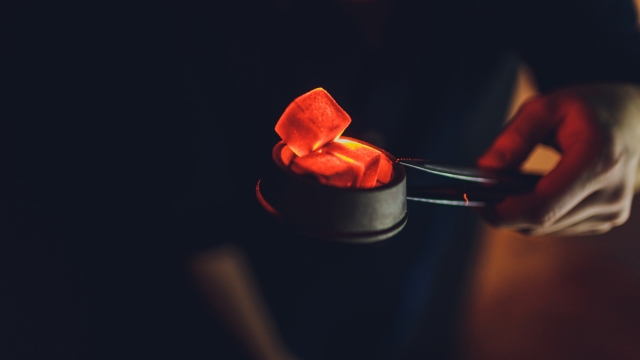
To light your hookah coals, place them on an electric burner or coil-top electric stove. Subsequently, wait for the coals to turn white, indicating they’re ready for use.
Using hookah tongs, transfer the red-hot coals to the rim of the aluminum foil or heat management device on your hookah bowl. Following this step, allow the bowl to warm up for two to three minutes before starting your smoking session, as this will generate more flavorful smoke.
6. Placing the Coals
Correct placement of hookah coals is critical to consistent heat and an enjoyable smoking experience. This section will discuss their optimal placement on the hookah bowl and how to manage heat throughout your session.
Optimal Placement
Evenly distribute the coals around the outer edge of the hookah bowl, allowing them to hang off slightly. In contrast, avoid placing the coals directly in the center of the bowl until the end of the session, as this can cause the hookah tobacco to burn faster and produce harsh smoke. As you gain experience, experiment with different coal positions using hookah tongs to find the best arrangement for your preferences.
Managing Heat
Adjust the placement of the hookah coals to control the heat throughout your smoking session. If the smoke becomes too harsh, move the coals further away from the center of the hookah bowl. Conversely, move them closer to the center if the smoke is weak. Additionally, regularly rotate the coals to ensure even heating and prevent the shisha tobacco from burning.
Also read
What is a Hookah Bar: Exploring the Essence of a Timeless Social Experience
7. Assembling the Hose and Mouthpiece
With your hookah assembled, including the hookah shaft, and coals appropriately placed, it’s time to attach the hose and insert the mouthpiece.
This will ensure a comfortable and enjoyable smoking experience with flavored tobacco.
Connecting the Hose
Attach the hose to the hookah stem using a hose grommet to create an airtight seal. Ensure that it’s securely connected and that no leaks or blockages could affect airflow or the overall smoking experience.
Inserting the Mouthpiece
Secure the mouthpiece to the end of the hose. Make sure that it’s firmly attached and that there are no gaps or air leaks that could affect the quality of the smoke.
With the mouthpiece in place, you can enjoy your perfectly set-up hookah!
8. Final Checks and Adjustments
Before starting your smoking hookah session, perform final checks and adjustments to ensure your hookah is ready for use. This includes checking the airflow and pull and making necessary adjustments to the coals or hookah bowl.
Airflow and Pull
Check for smooth airflow and a comfortable pull by drawing on the hose and adjusting the hookah coals as needed. If the pull is too strong or the smoke is harsh, move the coals away from the shisha. On the other hand, if the smoke is weak or thin, move them closer.
Ready for Smoking
Once you’ve made the necessary adjustments and ensured your hookah is properly assembled, you can enjoy a rewarding smoking experience. Monitor the heat throughout your session and adjust the coal placement to maintain optimal flavor and smoke quality.
With practice and attention to detail, you’ll soon master the art of hookah setup and enjoy countless smooth smoke sessions. Furthermore, you can alternate between shisha and vaping if you’re of legal age. Additionally, to help avoid the risks of adverse effects, use CBD that stays in your system for a long time.
Also read
How Do Vapes Work? A Comprehensive Guide to Vaporization
Wrap Up
Although hookah setup may initially seem daunting, the knowledge can transform anyone into a hookah assembly master. With practice and attention to detail, the rewarding experience can be yours. So gather your friends, share your newfound knowledge, and enjoy the art of smoking hookah together. Happy hookah smoking!


